Shortcodes
Shortcodes
register-mlm-page
view-mlm-binary-network
join_network
mlm-left-group
mlm-consultant-group
mlm-payouts
mlm-payout-details
view-mlm-binary-network
mlm-network-details
mlm-personal-group
mlm-right-group
mlm-update-profile
mlm-epin-update
Getting Started
Overview
Binary MLM Pro is a plugin which enables you to run a full blown Binary structure based MLM Network within the WordPress CMS.
We suggest you read the following 2 articles to better understand the Binary Structure and the nature of compensation plan supported in the Binary MLM Pro plugin.
Binary and Unilevel Networks Explained
Binary MLM Pro and Binary MLM eCommerce Compared
Installation
WordPress Installation
- Go to Plugins > Add New.
- Under Upload, click Browse, locate binary-mlm-pro.zip in your plugin download package and click Open.
- Click Install Now to install the WordPress Plugin.
- If successful, click Activate Plugin to activate it.
FTP Installation
- Using a FTP program, upload the plugin folder binary-mlm-pro to the /wp-content/plugins folder of your WordPress installation.
- Go to Plugins screen in your WordPress admin and find the newly uploaded Binary MLM Pro plugin in the list.
- Click Activate Plugin to activate it.
WP Admin Settings
Payout Settings

This tab in the Admin settings is used to define the basic parameters of your compensation plan.
Pair – How many paid members in the left and right leg individually will make 1 pair for calculating commissions. Pair is the basic unit for calculating commissions in a Binary Network.
Initial Pairs – Some network plans will incentivise members with a higher commission in the initial days after joining. A slightly higher commission is paid for the first X pairs. This is the number of those X pairs for which the member will be paid a higher commission than the regular Pair Commission. In case you do not have such an incentive scheme you can specify a value of 0 (zero) for this setting.
Initial Pair Amount – This is the per pair amount that is paid for each of the Initial Pairs. Once again you can specify a value of 0 (zero) if you do not have such a differential commission structure.
Further Pair Amount – This is the payout amount for every Pair after the Initial Pairs. This is therefore the regular Pair Commission amount.
Direct Referral Commission – This is the amount paid to a sponsor for sponsoring a new member in the network. This amount is paid for an infinite number of personal referrals. This is not dependant upon forming a new pair in the downline. If a member refers a paid member in his downline, the referring member receives this Direct Referral Commission Amount for referring the new member.
Service Charges – An amount that is deducted from each Payout paid to the member as a fixed Service Charge. eg. $2 as processing fee for each payout. This can be an absolute amount or percentage.
Tax Deduction – Some countries have a legislation of deducting Income Tax at source (WithHolding Tax) while making commission payments to your members. This is specified as a % amount.
Cap Limit – The Maximum amount that can be paid to a member in one payout cycle. Anything above the cap limit will be flushed out and will never be paid to the member. Once again this is specified as an actual amount and not in terms of the number of pairs. Although if your network has a Cap Limit based on number of pairs, you can calculate the amount for the same by multiplying the number of pairs by the per Pair Commission as specified above.
Bonus Settings
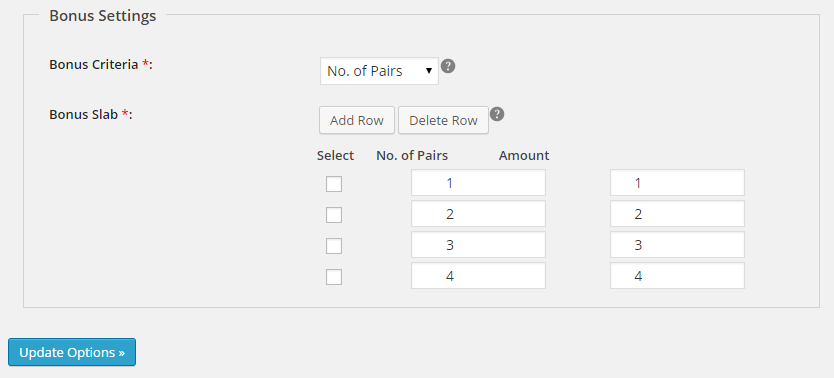
In case you have a bonus option in your Network, use this tab to configure the bonus settings.
Bonus Criteria – The bonus amount can be paid on the basis of Total number of Pairs in a members network or the Total number of members referred Personally by a member. Select the option that suits your network.
Bonus Slabs – Specify the total number of pairs or members that a member needs to achieve and the corresponding bonus amount for the same. To add a new slab click the Add Row button. Specify the number of pairs / members and the corresponding amount for the next slab. When you are done creating the slabs click the Update Options button.
| Example Slab Figures | |
| Unit | Amount |
|---|---|
| 5 | 1000.00 |
| 10 | 2000.00 |
| 20 | 4000.00 |
This implies that a member is paid a commission of 1000 on achieving 5 pairs or personal referrals (depending on the setting for your network).
On achieving the NEXT 10 pairs or personal referrals the member is paid a commission of 2000. So now the member has either 15 pairs or 15 personal referrals in total.
On achieving the NEXT 20 pairs or personal referrals the member is paid a commission of 4000. So now the member has either 35 pairs or 35 personal referrals in total.
Manage Products
Adding Product
Use this section to create the various products that you would like to offer on your site. This will not add any e-commerce functionality on your site but would enable you to sell multiple products on your site without the need to install an ecommerce plugin. Each product will be mapped to an ePin. More details about the same is available under the ePins Tab.
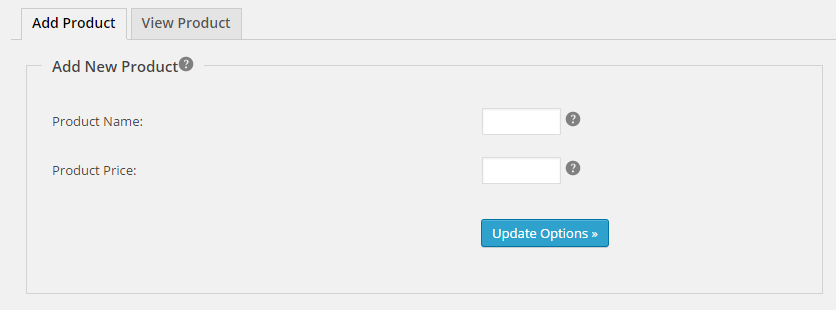
Product Name – This is the name of the product.
Product Price – This is the price of the product. The % commission figures will be applied to this price.
Viewing Products

Settings Overview
Use the main menu of Binary MLM Pro to configure the settings. Go to Binary MLM -> Settings to open the Settings Page. The settings page has the following sections /tabs.

Let’s understand the features and functions of each of the tabs.
Email Settings
Email templates for different activities like
- when a payout is received
- when a new member joins your downline
- when a withdrawal is initiated
- when a withdrawal is processed
are written and managed in this section

Payout Received Mail – When the payout routine is run this email template will be sent to all the members who have earned comissions and bonuses in the payout cycle.
Network Growing Mail – When a new member joins the network this email will be sent to all members in the upline of that user right upto the first user of the network.
Withdrawal Intiated Mail – This is the email that is sent to the site admin notifying him when a member initiates a new withdrawal.
Withdrawal Processed Mail – This email is sent to an individual member once his withdrawal has been successfully processed by the admin.
Regn Form Settings
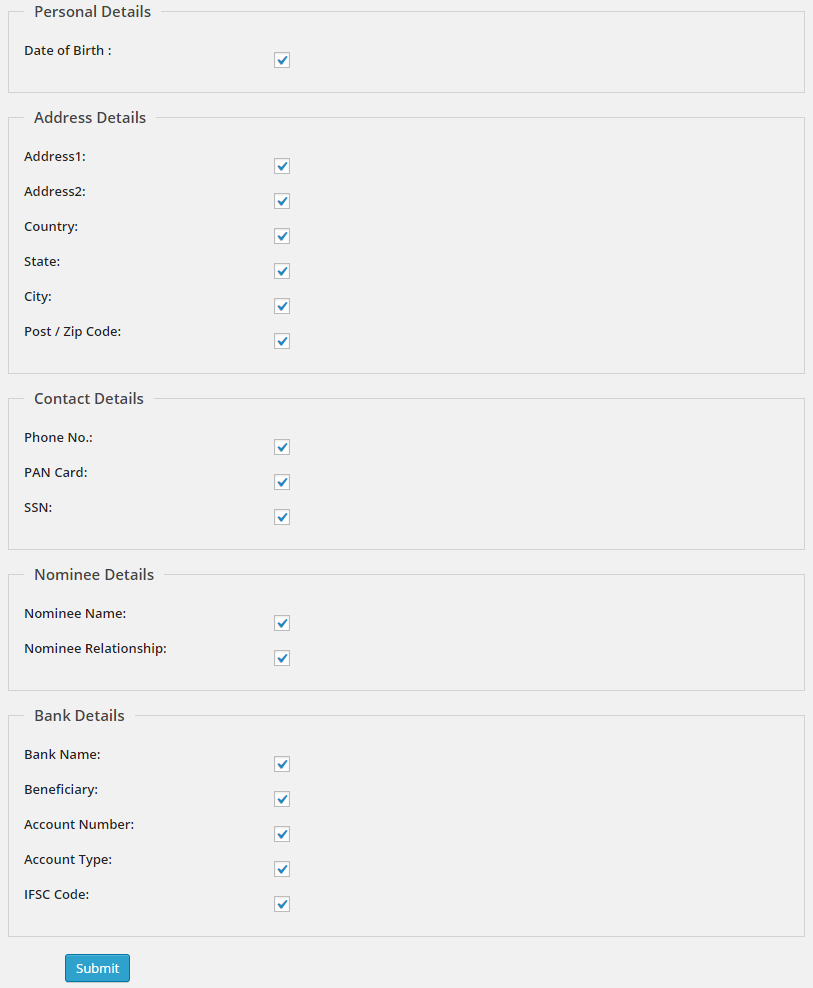
The fields that appear on the front end user registration form can be configured in this section. First Name, Last Name, Email, Password, Sponsor Name fields are shown by default on the registration form.
Additional fields can be selected from this settings page to be shown on the Registration Form. The additional fields have been logically grouped as:
Personal Details
Date of Birth
Address Details
Address 1
Address 2
City
State
Country
Post / Zip Code
Contact Details
Phone Number
PAN Card (specific to India)
SSN (Social Security Number)
Nominee Details
Nomine Name
Nominee Relationship (relationship of the nominee with the registering user)
Bank Details
Bank Name
Beneficiary
Account Number
Account Type
IFSC Code (specific to India)
ePin Settings
ePin is a mechanism using which users will be automatically marked as paid in the system. If the user registers with a valid ePin he will be registered and marked as paid.
You need to activate ePins at General setting page for ePins tab visibility.

A new tab “ePins” is added instantly as below in MLM Settings option tabs after ePin activation.

New ePins are generated using this section.

Select the type of ePin to generate. ePins can be of two types, viz.
- Free
- Regular
Any member registering on the front end using a regular ePin will automatically be marked as paid. Thus he will receive commissions from his downline and his upline will receive commissions from his joining.
Free ePins are a special type of Regular ePins. Any member registering on the front end using a Free ePin will be marked as paid. He would receive commissions from his downline but his upline would not receive commissions from his joining. This is because this member has not actually paid to join the network.
Select the product this set of ePins will be mapped to.
Number of ePins to generate. A maximum of 999 ePins can be generated in one run.
Reset All MLM Data
If you wish to erase all MLM Data, click the “Reset All MLM Data” button. This will erase all users (except your WP Admin), all MLM Settings, Commissions, Bonuses, Payouts, etc.
CAUTION: Be very sure that you would like to erase all MLM data and start afresh. There is no way to get your data back once erased (unless of course you have a backup).
Create First User
As the first step towards configuring the plugin and start building your network you are required to create the First User of your network. The first user would typically be the company account and all others users would utlimately be in the downline of the first user.

To create the first user account you are required to choose a username, password and email address. Once the necessary fields have been filled up click the Submit button. This would create a new user in your WordPress database. This user would also show up in the default Users -> All Users interface.
Please note that the default WP admin user which you created while installing WordPress is NOT an MLM user. Hence none of the features and pages in the Member’s Area would work while you are logged in as the default WP Admin user.
To start testing and building your network you can use the username of the first user as the sponsor username on the front end registration form / Join Network page.
General Settings
The General Settings tab is a very important page as the basic parameters of your network are defined here.
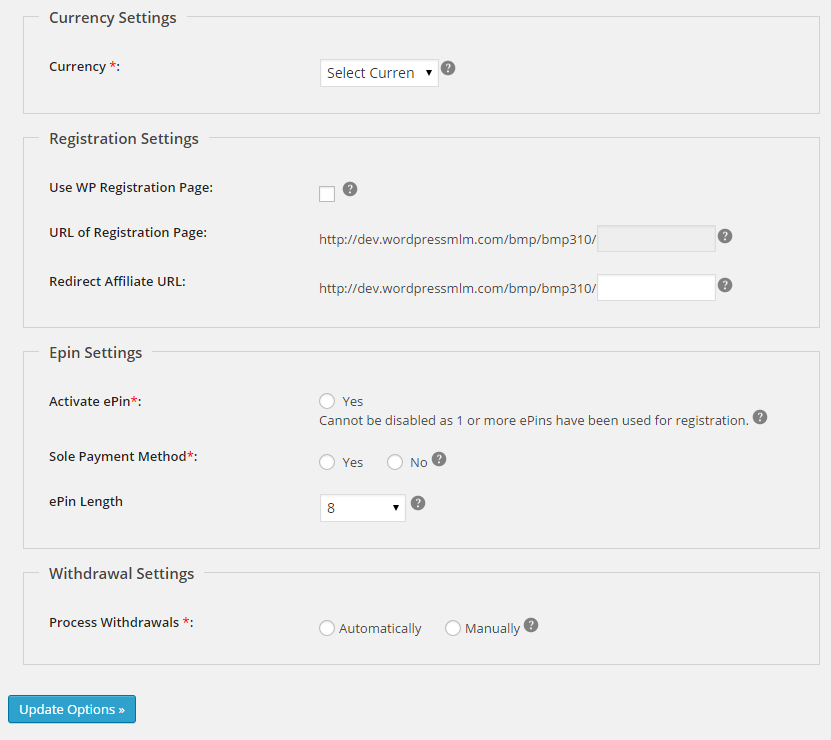
As the first step you are required to specify the base currency of your MLM Network. This option is very important as all calculations will be performed in this base currency. Once you have chosen the currency and saved the options, it CANNOT be changed later. The entire network will need to be reset if you decide to change the currency at a later date.
In case you would like to use your own custom registration page (and not our default register-new-user page) for registering users on your site, please check the option Use WP registration Page
If you are using a custom registration page you would need to specify the URL of your custom page in the option URL of registration page.
Each member in your network gets an affiliate URL in the format:
http://www.yourdomain.com/u/{username}
{username} is dynamically replaced with the username of every user. We had to introduce the /u/ in between so that our plugin does not interfere with the default Permalink structure for WordPress.
The affiliate URL redirects the prospective visitor by default to the registration page. If you would like the affiliate URL to redirect to another page on the site you can specify the URL in the Redirect Affiliate URL option. We suggest that you read our Blog article on Replicated Sites to understand this functionality better.
Next you are required to choose whether you would like to Activate ePin based registrations on your site. In case you would like to Activate ePin functionality on your website, set this value to Yes.
In case members can only register on your site via ePin, set the Sole Payment Option to Yes. This would make the ePin field mandatory on the user registration form and a visitor would need a valid unused ePin to complete his registration. If this value is set to No, a visitor will be able to register on the site even without specifying a valid ePin. In this case you would need to manually mark the member as Paid / Unpaid under Users -> All Users or assign a valid ePin to the user on that page. Alternately, the user can also input a valid ePin and upgrade his account to a paid account from his Member’s Area.
Choose the length of the generated ePins from the ePin length field. Though our routine generates random ePins, we would recommend a mimum length of 8 characters for security reasons. Choose your option from 8 characters long to 15 charactes long.
WIthdrawals can be handled in two different ways in your network. If you would like that each member needs to login to his Member’s Area and make a withdrawal request for each payout himself then set the option Process Withdrawals to Manually. On the other hand if you would like that the payout of each member appears in your WP admin area as a Pending Withdrawal automatically then set this option to Automatic. This would ensure that the member does not have to login to his member’s area in order to make a withdrawal against the commissions he has earned in various payouts. As soon as you run the Payout Routine the commissions payable to each member would start showing up as Pending Withdrawals in your WP admin area automatically.
Eligibility Settings

Use this screen to define the eligibility criteria for a member to start earning commissions in the network. Of course, the member needs to be a Paid Member himself in the network.
No. of Direct Paid Referrals – The number of members that a member will need to directly and personally refer in the network before he can start earning commissions.
No. of paid referral(s) on right leg – The number of paid direct and personal referrals a member needs to introduce in this right leg before he can start earning commissions.
No. of paid referral(s) on left leg – The number of paid direct and personal referrals a member needs to introduce in this left leg before he can start earning commissions.
Typical Binary Programs will have this set to 2,1,1 but in case your network does not have any eligibility criteria i.e. the member can start earning without referring anyone himself then set this to 0,0,0.
WP Admin Run Payout
Run Payouts
Use this screen to run the Payout routine for your network.
While testing the plugin use the Distribute Commission and Bonus button below after adding a few members to the network. On a live site the following URL needs to be scheduled (cron job) to run every hour for the commission and bonus routines.
http://yourdomain.com/wp-content/plugins/binary-mlm-pro/cronjobs/commission-bonus.php
The commission and bonus routines would simply keep distributing the commission and bonus amounts in the member accounts. They would not show up in their account till the time the Payout Routine is not run.
This script can be run manually once every week, every fortnight or every month depending on the payout cycle of the network. Alternately, please schedule (cron job) the following URL as per the frequency of the payout cycle.
http://yourdomain.com/wp-content/plugins/binary-mlm-pro/cronjobs/paycycle.php
When you click the Run Payout routine, the system will show a list of all members who have received commissions and bonuses in this payout cycle. If everything is correct, you will need to click the All is Well, Commit button to Commit the Payout.

WP Admin User Report
User Report
Use this section to collect complete information about the member’s account.
You have to input a member’s username or email address in the input box.

WP Admin Withdrawals
User Withdrawals
Use this section to get list of all pending User Withdrawals. Click at “Export to CSV” button to export list of data as CSV format.
Process – Input the payment details for the withdrawal. These payment details would also show up on the User’s Payout Details Page.
Delete – This would mark the withdrawal as deleted. The user would need to initiate a fresh withdrawal for this payout from his interface.

WP Admin Reports
Reports
Use this section to collect report for Earning, ePin, Withdrawal and Payout.

Let’s understand the functions of each of the tabs –
Earning Reports:
Use this tab or section to view Earning reports as per your custom date filter.
ePin Report:
Use this section or tab to list all the ePins that have been generated already.
You can filter the results to see just the Used Pins or Unused Pins. If you want to revert back to the default listing, just click the Reset Button.
The Search and Export to CSV function will work on the currently active records i.e. if you are currently on the Used ePin Filter then performing a search or Exporting to CSV will apply only to the Used ePins.
Withdrawal Report:
Use this section or tab to view list of all withdrawal requests that have been successfully processed. Click at “Export to CSV” button to export all list data in CSV format.
Payout Reports:
Use this section or tab to view list of all Payout requests that have been successfully processed.
Registration Form
User Registration Form
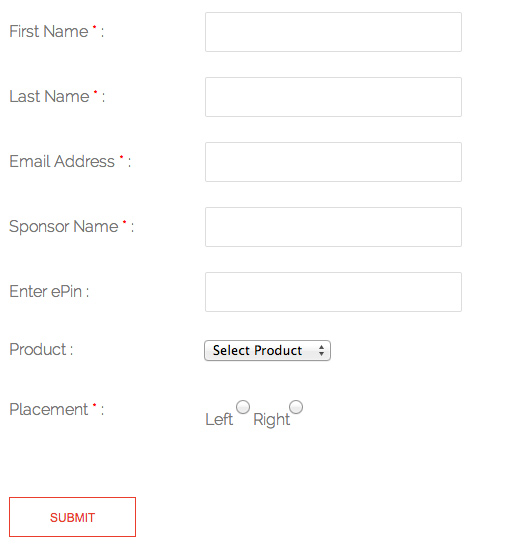
General information like username, password, email, first name and last name are collected at Registration form page.
The registration form displays four important fields like – Enter ePin, Product, Sponsor Name and Placement.
The registration form fields “Enter ePin” and “Product” drop down are visible when under General Settings in the WP Admin “Sole payment method” is set to OFF. New user can select either the Product or enter an ePin at the time of registration.
When the “Sole Payment Method” is set to ON, the registration form will only show the “ePin” field. It will be mandatory for the user to enter an ePin at the time of registration.
In case a user comes to the website using an existing member’s affiliate URL, the Sponsor Name field will be automatically filled with the username of the user whose affiliate URL was used. In case the user comes to the website directly, he will be required to input the username of an existing member who referred him to the network.
New user is free to choose left or right placement.
The additional fields shown on the form will depend on the fields selected under the Registration Settings tab in the WP Admin.

Frontend – Network
Frontend – Network
Frontend network is overall a single platform to view user ‘s personal and functional information like payouts, left or right group etc. It has the following informational and functional links –

Network Details:This is the user’s Dashboard page and shows a summary of his Genealogy, Payouts, Left or Right Leg sales, Personal Sales.
The user can update his profile by clicking the Edit link under the Personal Information block.
This page also shows the user’s affiliate URL which he can use to refer new users to the network.
Genealogy:
This page shows the user’s genealogy in tree form. Each empty node in the Genealogy has a Add New link to place a new member at that particular node.

Left Group:
Use this section to view Left Group (users on your left leg) details like – user name, user key, sponsor name, status of the user. You can also view total number of user and total number of active user at this section.
Right Group:
Use this section to view Right Group (user on your right leg) details like – user name, user key, sponsor name, status of the user. You can also view total number of user and total number of active user at this section.
Personal Group:
This is the a list of users that you have personally sponsored (direct referrals) in the network. You can view each user details like – user name, user key, sponsor name, status of the user. Total number of users and total number of active users can also be viewed at this section.
My Consultants:
Use this section to view all members in your downline (left and right legs). You can check total number of users and total number of left or right legs at this section. A list of each user’s User name, User Key, Sponsor, Placement(left or right) and Status(active or inactive) is also available at this section.
My Payouts:
This page shows a list of all those payouts where a member has earned commissions and bonuses. This page summarises information about Total Amount Credited, Pending Payments, Processed Payments, Available Amount.
You can also view list of each payout’s date, amount and status at this section. Click at “view” link at action column to view each payout detail.
Join Network:
Use this section to become MLM user if you are non-MLM user. You have to fill “Join Network” form to become user. Form screenshot has been shown below –
ePin Update:
In case a member has registered on the front end without an ePin his default status in the network would be unpaid. After the member has obtained a valid ePin from the Admin, he can go to this page to input the ePin and change his status to Paid in the network. In case your network does not use ePins, then the Admin would need to visit the Users -> All User page in the WP Admin to mark this member as Paid.